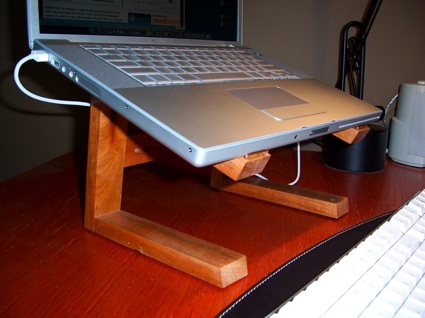
If you happen to use laptop for long durations then you definitely need a laptop stand to make it easy to use the laptop while lying in your bed in a relaxing position.

Sure you could buy a laptop stand but if you would like to have one for minimum possible cost or if you are an environmentally friendly bloke then making one for yourself using wood is going to be a whole new experience.
For this DIY project you’ll need parts that cost less than $3 and can be made easily in around half an hour or one hour’s time depending on your skill level. The laptop stand won’t be able to cool down your laptop in case you intent to play graphics intensive games, but still it would provide enough space for air flow to keep it cool for normal surfing work.
Caution: If this DIY is undertaken by children it should be done under strict supervision of an adult.
Things needed:
- 2 brackets VALTER from IKEA wood pieces
- 2 screws
- Mouse pad
- Glue gun
Step 1:
Take the two brackets and mark a line on the one side of the bracket to cut-off about an inch of the IKEA wood. These wood pieces will be used later on to make the stoppers for your laptop stand so that the laptop stays in place and doesn’t slip down.
Step 2:
Now, take these two cut wooden edges and fix them like a stopper in the opposite direction to the bottom part of the laptop stand or should I say the bracket. To attach it, use a good industrial grade adhesive or a glue gun so that the pieces don’t fall-off after persistent usage.
Step 3:
Take another piece of wood and make the bridge between the two brackets depending on the size of your laptop. If you are going to use multiple laptops then you can opt for a bigger bridge size so that it can accommodate any size laptop with ease.
Step 4:
Now, attach the piece of wood onto the two brackets with screws and secure it with glue to make sure it doesn’t fall loose with the weight of the laptop.
Step 5:
As an additional step to this do it yourself project, you can cut down a thin wooden board or take a mesh wireframe base to make sure the laptop doesn’t fall in between the space of the two brackets. You can attach horizontal or vertical bridges that support the laptop and allow you to move about freely while using the stand, without any fear of the laptop falling off.
Step 6:
You can now paint the wooden laptop stand in colors of your choice or make some graphics that suits your style.
There you have it, your own laptop stand created in a jiffy with only $3 or parts costing under $3 that are readily available. If somehow you are not able to find the brackets VALTER from IKEA wood pieces, you can ask your local carpenter to cut out wood pieces in the exact same size and get them sanded. Thereafter, you can fix them yourself and make the wooden laptop stand for your laptop. Good luck with the project.


0 Comments.