


Your dwelling is your personal space where you can reflect your own values and personality which speaks a lot about you as a person. No wonder people invest so much time and money into their home décor, buying things that will match the theme of the interiors. But it is not always true that what’s expensive will surely go with the interiors of your home.
When you wish to add wonders to your home décor in budget, this is where a bit of intuitive thinking and the will to venture out on DIY projects for home décor always pays-off.
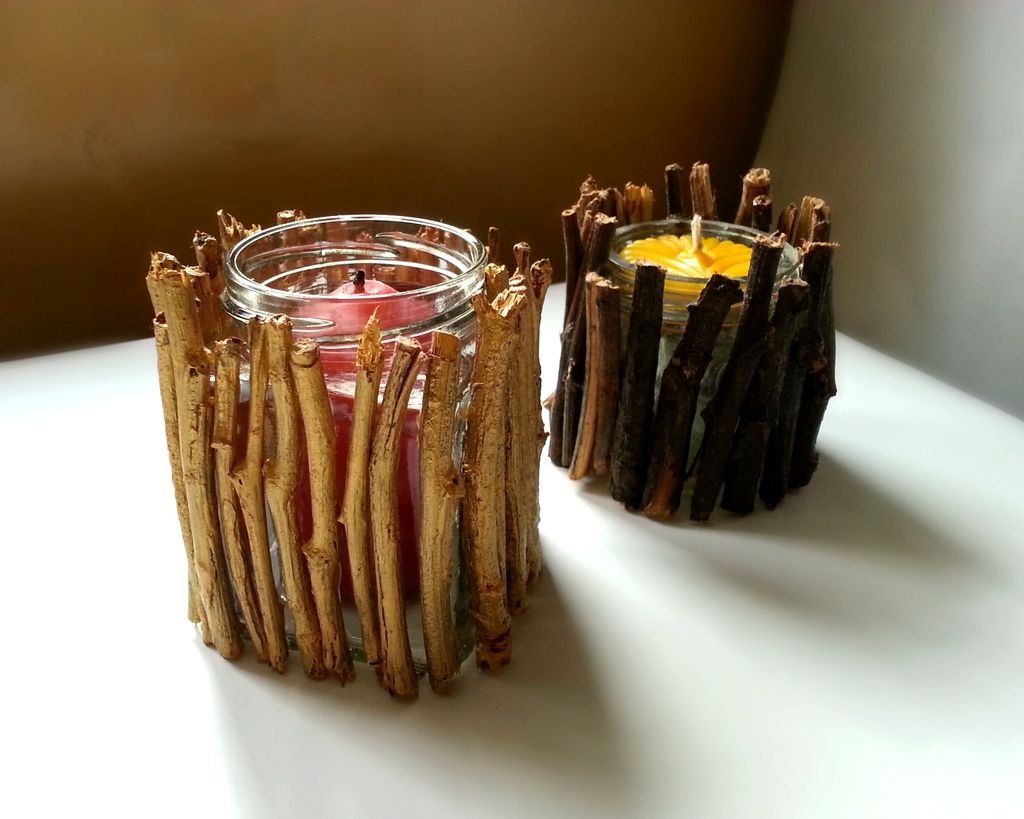
Today, we are going to acquaint you with some home décor tips with easily available material like candles. To be more precise, we’ll tell you how to make rustic candle holder at your home within no time, and they will surely enhance the look of your living room this festive season.
So, let’s have a look at the detailed steps on how to make rustic candle holder at home with dirt cheap materials. Keep in mind that you can incorporate your own modifications to the DIY to make it even better. That you’ll be able to do once you go through the DIY and ideas start bubbling in your mind.
Step 1: The materials required for the DIY
You’ll need these things to make the photo frame, vase and candle holder itself; so the first step is to get hold of these things.
- Lots of twigs/wood sticks
- Glue and tape
- A very sharp knife
- A glass jar of the size you want to make the candle holder
Step 2: Resize the sticks
First of all you’ll need to select the best sticks and then cut them to the length desired. Optimally they should be the size of your glass jar. Once you figure the size of the sticks, you need to cut them with the knife, avoiding any sharp edges of the sticks itself and smoothening them.
You should choose so many sticks that they cover the jar from all directions equally.
Step 3: Color the sticks
The next step is to color the sticks in golden color or silver, as you find fit. Personally I would go for golden color since it gives the candle holder a very rusty and majestic look. Once you color the twigs, leave them to dry on the sun.
Step 4: Gluing them to the jar
The next step is to glue them onto the glass jar from all directions until the jar is completely covered by the twigs. To make sure that the twigs don’t fall after certain period of time, buy a good adhesive that has a strong holding attribute.
Step 5: Apply varnish
Once you have made sure the twigs are completely glued onto the jar, the next step is to apply wood varnish to give it a very shiny look that stays for a long time to come.
There you have it, a rusty candle holder that can be made in one hour’s time flat without any hassle. If you want to get more creative you can add your own ideas to this DIY or use some other material to enhance the look of the candle holder.
Since Halloween is fast approaching; therefore, you can put your thinking cap on and theme the rusty candle holder with a spooky look. Otherwise, you can make small little changes like change in the color or using some other material instead of twigs to complete this DIY. Good luck!
0 Comments.