


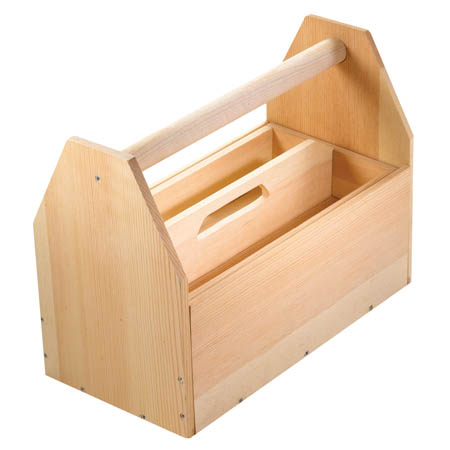
To make a wooden toolbox at home, follow the steps mentioned below and see how easy the whole process can be.
Things you will require
- 6’ 1×10 clear pine
- 6’ 1×6 clear pine
- 2-4’ 1 ¼“daimeter dowel
- Wood glue
- Wood screws
- Pilot drill
- Bit brace
- Pull saw
- Sandpaper
Step 1:
Firstly, begin by deciding on a particular size for the wooden toolbox. As a suggestion, try making it a little bigger so that it can accommodate longer tools easily.
Now ensure that wood for the box has square ends. Use T-square to mark lines about an inch from the end and trim them down with a saw.
Step 2:
Once done with trimming the wooden squares, measure and begin cutting them.
Because, the bottom and side of the toolbox will have caps in the ends, you need to cut them a bit longer than other pieces.
Cut two sections with 1×6 dimensions and one with 1×10 measures. Using the square mark them and cut accordingly.
Step 3:
Precisely design the end pieces and cut them. Measure six 1/4’’ to the bottom of 1×10 section and spot it on two banks of the board.
After this, mark 11” from the bottom edge and mark the mid-point of the plank using a combination square. At midpoint, mark a circle about 1” using a compass. Don’t draw a complete circle as you only need an arc of it.
Connect the mark at 6 ¼’ with the arc and repeat the same for the other side.
Step 4:
Place the compass on 11” mark and draw a circle at 1 ¼’ mark hole. Cut out this section using a pull saw. Once the piece comes out easily, trim the tip and repeat the whole process again.
Drill a hole in the handle using brace and bit. Make sure that that you place the center screw in the midpoint of 11” mark.
For a better, uniform finish, turn and repeat the drill when you are halfway done.
Step 5:
Use a rasp and clean the top of side piece. Remember to repeat the whole thing for the other section and you can use the first one as a stencil.
Attach the end pieces to the end of the board and screw them tight. Because the board is thick, ensure that you screw the pieces to the middle of the bottom board. Use combination square and mark a line across the sidepiece.
Step 6:
Place the edge of side section over the end of bottom plank and screw it accurately. Make sure that you drive screws deep into the surface.
Use wooden glue to the section and hammer to make the joints stays resilient.
After screwing and gluing, the two sections should make a right angle with each other, repeat the whole thing again for the opposite side.
Step 7:
By now you will have a good frame for the toolbox. Simply add the longer sections between the two the triangular faces, but they should be placed rightly above the bottom section.
Screw the two ends with the frame and trim down unnecessary portions. Use sand paper and provide proper finish at the ends, especially the handle of the toolbox.
0 Comments.